Apple gives you multiple built-in ways to convert Live Photos into standard video files. No third-party app needed. The best option is the “Save as Video” feature in the Photos app: it keeps audio, preserves original quality, and leaves your Live Photo completely untouched.
Let’s walk through each method, starting with the one you’ll use 95% of the time.
Method 1: “Save as Video” in the Photos App
Step-by-Step
- Open the Photos app.
- Go to Albums → Media Types → Live Photos to find your Live Photos quickly.
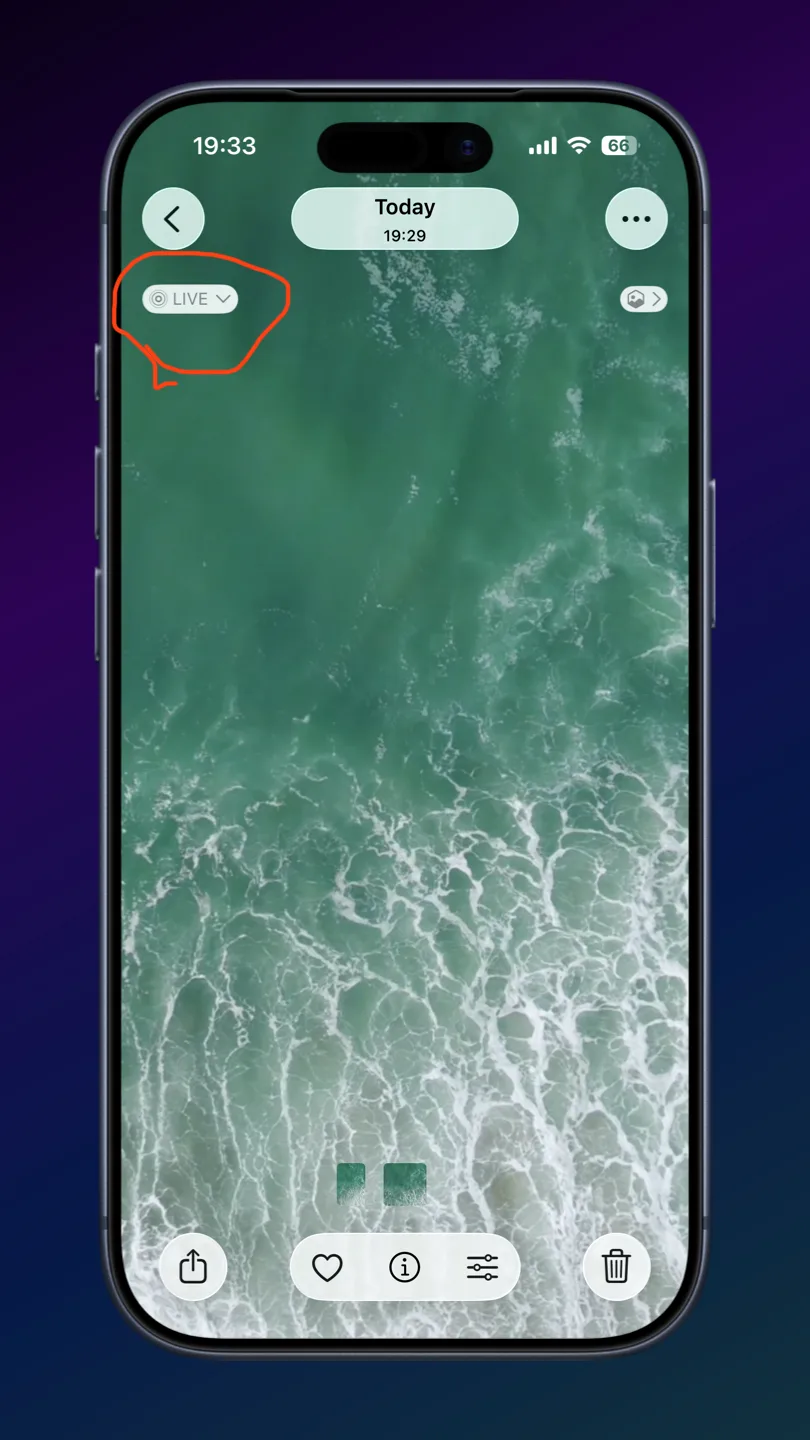
- Tap the Live Photo you want to convert to open it full-screen.
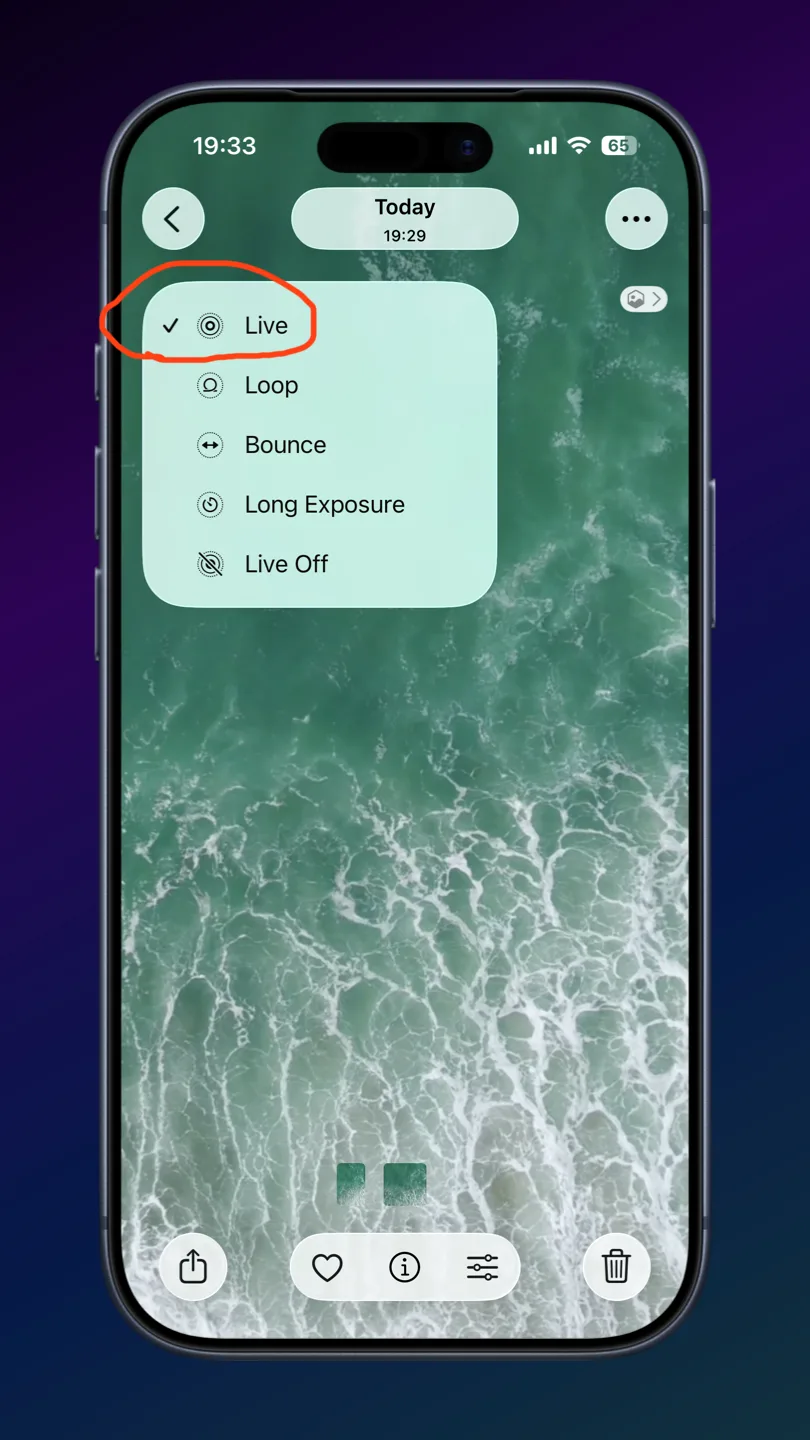
- Critical check: Look at the upper-left corner. It must say “Live”. If it says Loop, Bounce, Long Exposure, or Off, tap it and select “Live” from the dropdown. The Save as Video option only appears in Live mode.
- Tap the three-dot (⋯) button in the upper-right corner.
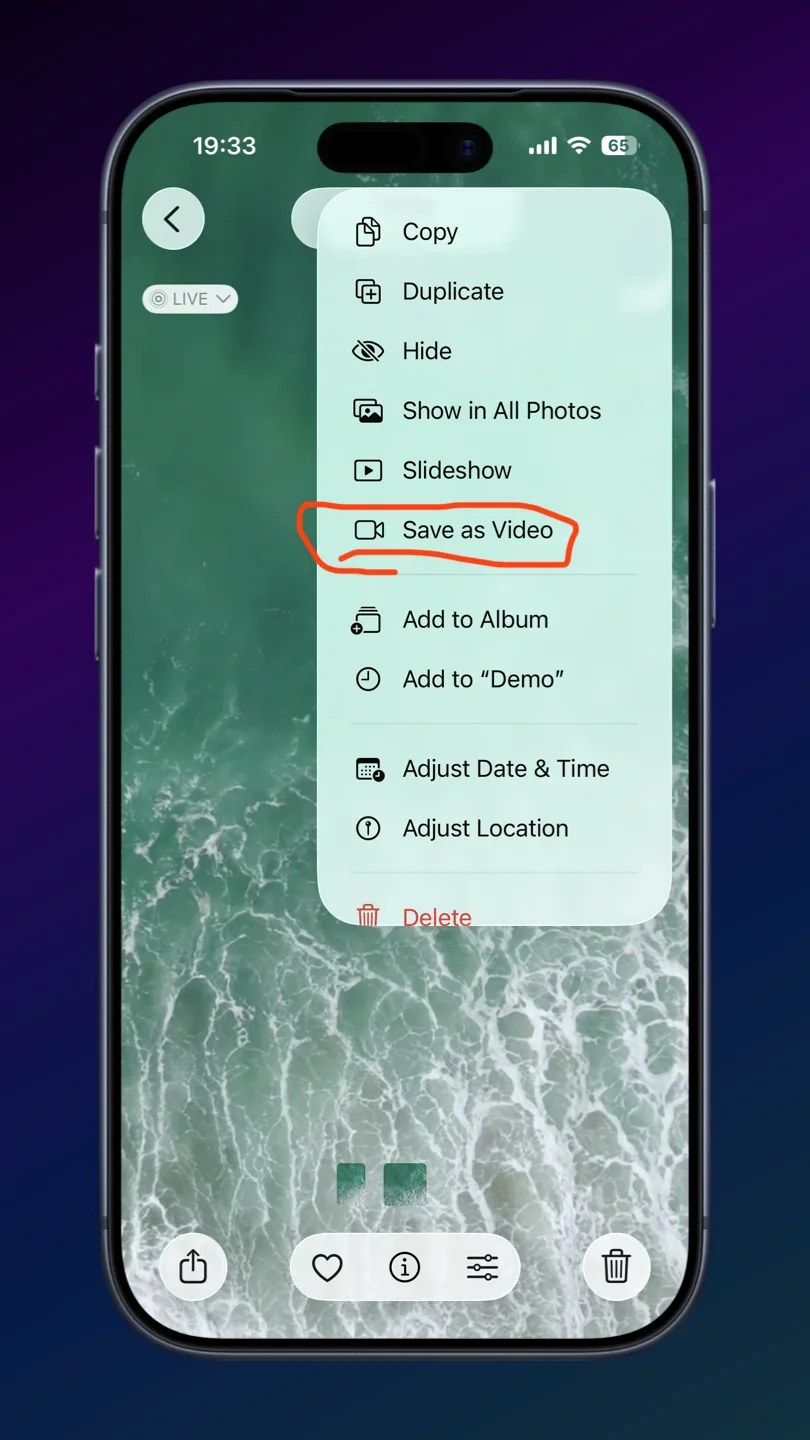
- Tap “Save as Video” from the dropdown menu.
- Done. The video is saved instantly to your library.
Output Specs
The video format is HEVC (H.265) by default, but it auto-converts to H.264 when you share to non-Apple devices. Duration is roughly 3 seconds (1.5s before and 1.5s after the shutter press). The original Live Photo stays intact in your library.
Convert Multiple Live Photos at Once
You can select multiple Live Photos and merge them into one continuous video. The clips are stitched together in chronological order.
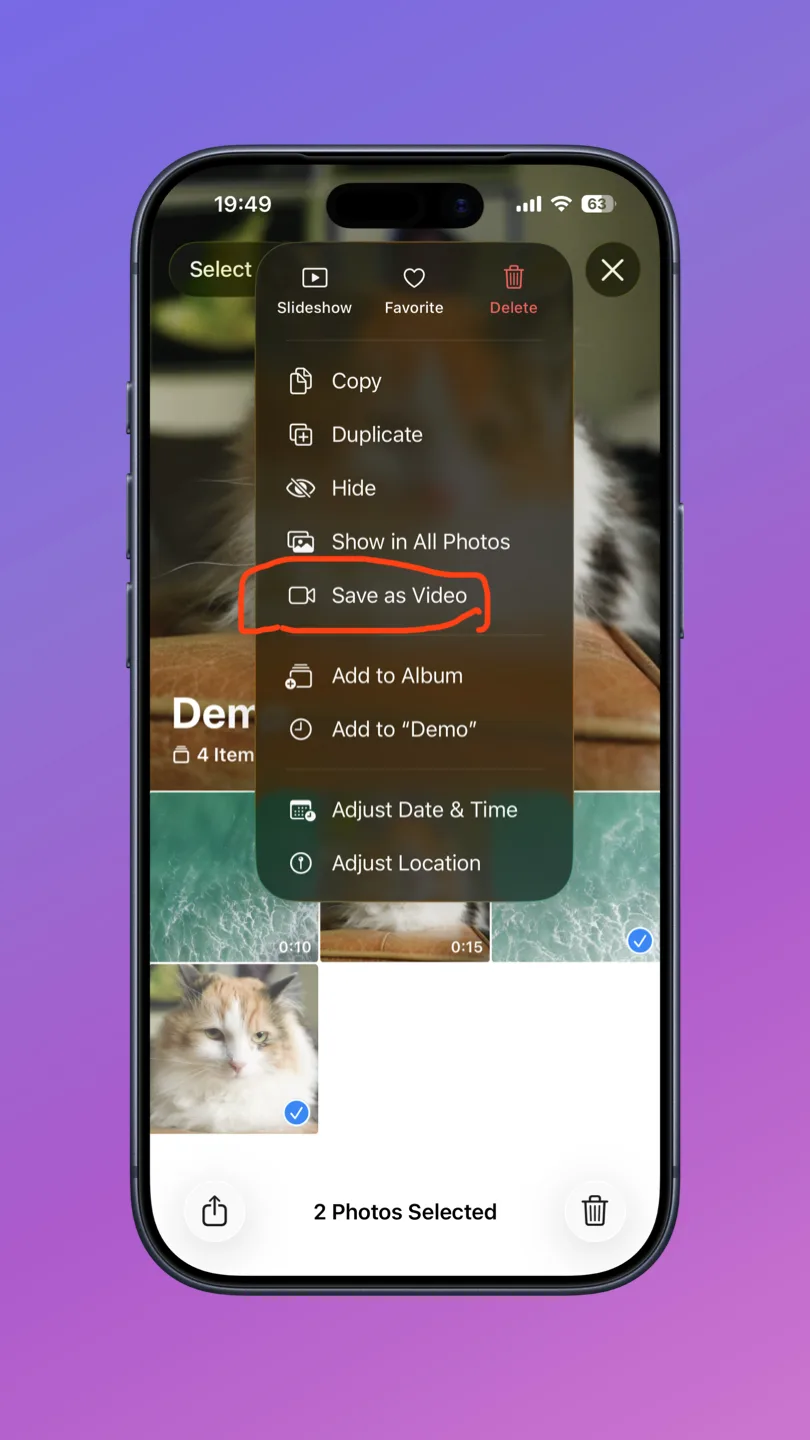
- In Photos → Albums → Media Types → Live Photos, tap “Select” in the top-right.
- Tap each Live Photo you want to include. Checkmarks appear on selected items. Every selected photo must be in “Live” mode. If even one has Loop, Bounce, Long Exposure, or is a regular photo, the option disappears.
- Tap the three-dot (⋯) button in the bottom-right corner. (Note: this is a different position than for single photos.)
- Tap “Save as Video”.
- All selected Live Photos merge into one continuous video.
Multi-select creates one merged video, not individual files. If you need each Live Photo as a separate video file, use the Shortcuts method below.
Method 2: Shortcuts App for Batch Individual Conversion
Need to convert a bunch of Live Photos into individual separate videos? The Shortcuts app (built into iOS) handles this perfectly. You’ll build a simple 3-action shortcut once, then reuse it anytime.
Build the Shortcut
- Open the Shortcuts app and tap the “+” button in the top-right.
- Add the action “Select Photos”. Tap it to expand, then toggle on “Select Multiple”.
- Add the action “Encode Media” below it. Leave default settings. This is the key action that extracts the video component from each Live Photo.
- Add the action “Save to Photo Album”. It defaults to the Recents album.
- Optionally add “Show Notification” with a message like “Conversion complete!”
- Tap the shortcut name at the top to rename it (e.g., “Live Photos to Videos”), then tap “Done”.
Use the Shortcut
Open Shortcuts, tap your shortcut, pick your Live Photos from the picker, and each one gets saved as an individual video in Recents. That’s it.
Method 3: Files App Workaround for Loop/Bounce
When you apply a Loop or Bounce effect to a Live Photo, the “Save as Video” option disappears from the Photos app. The Files app provides a workaround.
- Open the Live Photo (with Loop or Bounce applied) in Photos.
- Tap the Share button → “Save to Files” → choose a location → tap Save.
- Open the Files app and find the saved file.
- Tap the Share button → “Save Video”.
- The video now appears in your Photos Recents album.
Loop and Bounce videos saved this way lose audio. The output will be completely silent. If you need audio, switch the effect back to “Live” and use Method 1 instead.
Method 4: Screen Recording (Fallback)
When nothing else works, screen recording is a crude but functional fallback.
- Open Control Center (swipe down from the top-right on Face ID iPhones).
- Tap the Screen Recording button (circle icon). A 3-second countdown begins.
- Switch to Photos, open the Live Photo, and press and hold to play it.
- Stop recording via Control Center or the red status bar.
- Trim the video in Photos to remove the countdown frames.
Screen recordings capture at screen resolution (not the original photo resolution), include any visible UI elements, and produce noticeably lower quality than the other methods. Use this only as a last resort.
Live Photo Effects vs. Save as Video
This is the most common source of confusion. Loop and Bounce are not videos. They are playback effects applied to Live Photos. They don’t create separate video files and don’t share well outside the Apple ecosystem. Here’s how they compare:
| Feature | Save as Video | Loop | Bounce | Long Exposure |
|---|---|---|---|---|
| Output type | Standard .MOV video | Playback effect | Playback effect | Still image |
| Audio | ✅ Preserved | ❌ No audio | ❌ No audio | N/A |
| Duration | ~3 seconds | Continuous loop | Forward + back | N/A |
| Share anywhere | ✅ Universal | ⚠️ Apple mainly | ⚠️ Apple mainly | ✅ As photo |
| Separate file | ✅ Yes | ❌ No | ❌ No | ❌ No |
8 Gotchas You Should Know
Before you start converting, be aware of these common pitfalls that trip people up:
- “Save as Video” disappears with effects on. This is the number one source of confusion. Your Live Photo must be set to “Live” mode. If Loop, Bounce, Long Exposure, or Off is active, the option won’t appear.
- The three-dot button shifts position. It’s in the top-right when viewing a single photo, but moves to the bottom-right in multi-selection mode.
- The saved video gets the original photo’s date. It won’t appear at the top of your Recents. It’ll be buried at the original photo’s date in your timeline. Check the Recents album to find it.
- Mixing selection types breaks multi-convert. Selecting even one regular (non-Live) photo alongside Live Photos hides the “Save as Video” option for the entire batch.
- Multi-select = one merged video. It does not create individual files. Use the Shortcuts method for individual batch conversion.
- iCloud downloads may be needed. If your Live Photos are stored in iCloud but not downloaded locally, they must be downloaded before conversion works.
- Loop/Bounce via Files loses audio. The “Save as Video” method preserves audio. The Files app workaround for Loop/Bounce effects produces silent video.
- Video quality ≠ photo quality. The video component of a Live Photo is ~1920×1440, while the still image is 4032×3024. “Save as Video” outputs at the video resolution, not the still image resolution.
The fastest way to find your newly converted video: open Albums → Recents and scroll to the bottom. Or search by the date the original Live Photo was taken.